| Disclosure: Just to be open and honest the buttons and links you click on in the website will in most cases take you to another website where you can purchase the products I am reviewing. As an Amazon Associate I earn from qualifying purchases. |
How to read a Fish Finder Screen
Quick Post Navigation
Introduction to Fish Finders
Whether you are looking to spend 300 dollars or 3000 dollars, you are looking for the best fish finder you can buy for the money you are able to spend. Obviously, one of you main concerns is if it will help you to locate and find fish for you want to reel in. For many people, technology is something that may seem intimidating or even so complicated it may not seem useful.
Fish finders are actually fairly simple to use and operate and, once you know how and why they work, you will find them to be easily useable and, more importantly, you will find just how much they are able to help the amount of fish that you bring in every day. The purpose of this article is to allow you to be able to pick up a fish finder screen and be able to read it and put it into use on your own personal fishing adventures.
What You Will Need
The most obvious thing you will need to be able to read a fish finder screen is a fish finder! In addition to this, you will need a vessel to operate and something to be able to catch the fish you are trying to capture. As for learning how to operate the fish screen, it may be helpful for you to also keep your manual nearby, just in case you have a question that is more complex and beyond the scope of this article.
I would like to first applaud you for reading this article in an attempt to help you use your fish finder. Unless you are reading this article on a boat, the first piece of advice I will give you about learning to read your fish finder is to use and play around with it before you take it out on an actual fishing venture.
There is nothing more disheartening than losing an expensive piece of equipment on the first use, trying to use it and not being able to. In order to find the fish you seek, make sure you understand this article and understand how to interpret the data you are given on your screen.
In order to install this equipment on your boat, make sure that you have access to the tools and equipment that are listed as needed within the manual you find with your fish finder. Making sure that everything is in the proper place will insure that the fish finder will work at its optimal potential for you.
What You Will Learn
First off, you are looking at a screen and a couple of different objects attached to cords and your boat, this object on the cord is called the transducer and it allows for the fish to be detected in the water. The fish are able to be detected because the transducer actually emits sonar waves that bounce around the water, feel out the speed, distance and the rate at which the waves return.
These waves are then transmitted onto the screen in order to outline the various objects (hopefully, mostly fish) so you can see this data represented on the screen itself. You will mount the transducer on the rear of the boat, or wherever you manual recommends you put it.
The fish finder has different sensors that allow for the sonar technology to work. These three types of sensors are depth finder, water temperature and speed. Having depth finder sensors is important because it is going to allow you to see how far down something is on your screen (and, therefore, under the water!).
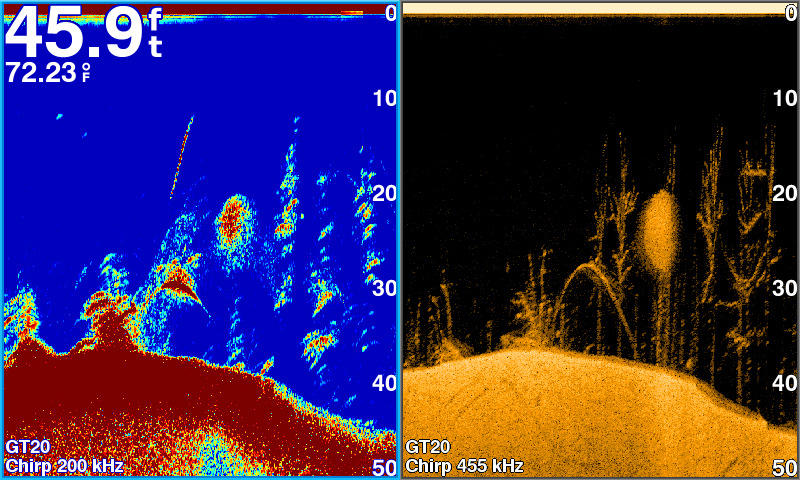
The sensor for depth is usually on the transducer and you can expect to be able to see more of what is below you and help you see what types of fish are in the environment. Generally, you will see the depth displayed on the top left of the fish finder screen, however it sometimes will be in meters instead of feet—which can throw you off at first!
The second sensor ability is that of measuring the water temperature. This is a pretty straightforward sensor that allows you to know the temperature of the water. Knowing how hot or cold the water is can tell you more about what types of fish are in the environment, which is good if you are searching for something specific. By looking at the temperature and looking at the fish you catch, you will learn in what temperatures you prefer to fish in.
By having a speed sensor, the final one in the trio of fish finder sensors, you are better able to know how fast you are moving. As you are looking at your monitor while searching for fish, it helps to have the speed available to you right there on your monitor. It may not be a function you think you will use too often, but it is important to appreciate how have a piece of technology that actually provides you with several complex technological sensors to help you on your fishing adventure.
This is one of the smaller features that I have personally come to enjoy and use frequently because I find myself looking at the fish finder screen more than anything else, until I have found my spot for the moment. Being able to appreciate the features comes with time, and I am sure you will find more to appreciate as your get more comfortable using it frequently. Some of these features I will go into a little more detail about right now.
So, now that you have a general idea of the goal of the fish finder, you want to learn about the sensitivity, or power, or the fish finder. This can be found underneath the menu button and will most likely be found under the heading “sensitivity”. Once you choose the “sensitivity” option from the menu bar (by clicking the enter button after selecting it) , you will see a graph appear on the side of the screen. One thing to keep in mind is that if you cut power, you are going to actually see less on your screen.
When you first start using your fish finder, you may not have a proper setting that allows for you to make sure you can see a far range on your screen. If you are unsure about this function, and especially for those just starting to learn to use it, a good recommendation is to choose the “Auto Depth Range” function on the fish finder.
This will enable you to always be able to see the bottom of the body of water on your screen. It is good for any and all beginners. It will potentially save you a lot of time, energy and frustration on trying to mess with different settings—until you become master of your fish finder that it! For starting out, this is a great, no hassle and easy setting to function on as you learn more about how to operate your fish finder screen.
Now, you may be able to see across your screen and to the bottom of the body of water—but how do you know how deep it actually is? A great function on this device is that it actually has what is called a depth cursor. This function is a line found on your screen that, used with the 4 way (up, down, left, right) cursor on your screen, you can move the depth cursor up and down and actually know what depth the fish are at underneath your boat.
This can come in handy in any situation—knowing the depth of an object could potentially be a very helpful thing on the ocean or lake! Once you have chosen this option from your devices menu, you may decide you do not want to use it. If that is the case, there is an exit button on your fish finder screen, you can find it on the device itself and not the menu that comes up on the fish finder screen itself.
Alternative Solutions
If you have read the above instructions and feel like the fish finder may not be for you, there are other options available for you to try! So don’t lose heart quite yet! These options allow for you to either use the same technology from a distance, by actually casting the transducer out and launching a float tube in order to use the sonar technology.
The steps for the system are fairly easy to use and are simply to launch the float tube (with the transducer), you open the float tube pocket, toss a rubber ducky into the water and then you simply push a power button on your display—and you are done. This wireless model allows for you to see the temperature, depth and the bottom, a word of caution is that it is not nearly as detailed as other models.

Although there is some varying degree of effect with different models and their quality, overall, the mounted models seem to get a better and clearer view. However, the user friendly nature of the model may outweigh the superiority of the picture on the display. Personally, depth and temperature are the most important functions, in my eyes, and so this model is perfectly functional in all respects.
One big downside to the wireless model, is that once the battery dies, your equipment has died as well. If you are a handy electrician type of person, you may be able to use soldering equipment in order to change the battery yourself and get a longer life out of your product. I have been able to purchase good quality, 40 dollar transducers and their life can be as long as 6 months, so it may be a worthwhile investment for you. It could be a good way to introduce yourself to the technology.
The final fish finder solution is one of the wireless models that actually uses your tablet or smart phone as the display. This is probably the most convenient and compact of all the options for you use. The quality of the sonar in this model is actually better than the wireless transducer we just talked about in the previous paragraphs.
I would personally use this model all the time, however there are a few drawbacks to it. First of all, you cannot use your phone or tablet and the sonar at the same time. However, in opinion, when I am out fishing, I usually do not want to deal with texting or phone calls, so this does not bother me all that much. However, there are some people that may find that fact slightly irritating to them. The second big drawback is that the app itself drains your battery very quickly.
As power is a commodity out on the water, you may have to use your sonar technology app sparingly, which can get annoying if you are not having luck finding any fish. The transducer itself has a battery pack that you can easily change. The average battery life on the transducer, for me, has been about four hours—just so you have a good general idea of how many hours of fish finding you will have before you need to switch out those batteries.
Final Thoughts
Now that you have a technical idea and breakdown of the screen and the inner workings of the fish finder screen, you should feel confident enough to go and take yours out on the water! If you are a fisherman who is looking for those fish that hang out in only 5 percent of the water, you may need this tool in order to help you find those bites!
A fish finder can come in handy on any body of water—it’s especially important when you do not know the spots where the fish like to hang out. By using this device, you can help make your fishing experience even more bountiful and fun. Knowing and using technology is something that can help anyone from the military (where the sonar technology was first invented and used) to you, the average fisherman, have a greater experience on the water. Check out our list of the best portable fish finders for more info.

Common Mistakes To Avoid When Using A Fly Rod

How to Fly Fish from a Boat – Tips for a Newbie.