| Disclosure: Just to be open and honest the buttons and links you click on in the website will in most cases take you to another website where you can purchase the products I am reviewing. As an Amazon Associate I earn from qualifying purchases. |
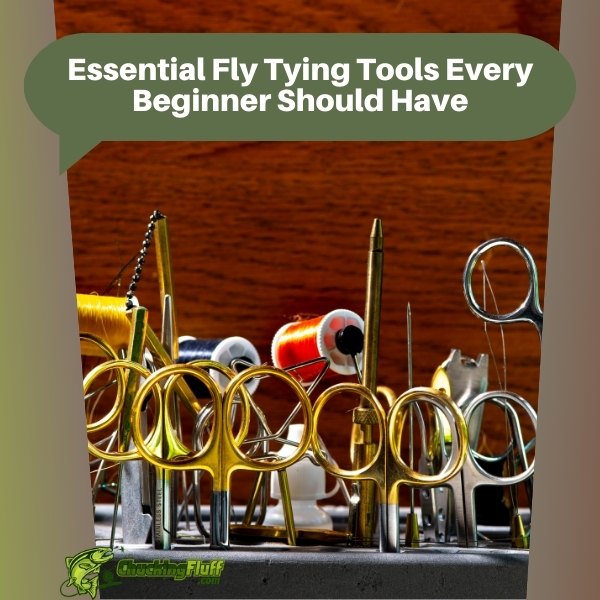
Essential Fly Tying Tools Every Beginner Should Have

Fly fishing is an art, and like any art form, having the right tools makes all the difference. One of the most rewarding aspects of fly fishing is tying your own flies. Not only does it give you a creative outlet, but it also lets you customize your flies for specific fish, conditions, and locations. But where do you begin? What tools are absolutely necessary, and which ones can you live without—at least for now?
Let’s dive into the essential fly tying tools every beginner should have and explore why each one is crucial for starting your fly-tying journey.
Quick Post Navigation
- Why Fly Tying is Important for Anglers
- Understanding the Basic Fly Tying Setup
- The Essential Fly Tying Tools
- Vise: The Heart of Fly Tying
- Scissors: Precision Matters
- Bobbin Holder: The Threading Tool
- Hackle Pliers: Gripping Made Easy
- Whip Finisher: For a Strong Finish
- Bodkin: A Fly Tyer’s Best Friend
- Threader: Simplifying the Process
- Hair Stacker: Perfect Alignment Every Time
- Dubbing Needle: The Secret to Fine Details
- Additional Fly Tying Tools to Consider
- Materials You’ll Need to Start Tying
- How to Choose the Right Fly Tying Kit
- Practicing Your First Fly: Tips for Beginners
- Conclusion: Start Tying Your Own Flies Today
- FAQs
- “Check out some of our other Buying Guides”
Why Fly Tying is Important for Anglers
Imagine this: you’re out on the river, the water is cool and crisp, and the fish are rising. You tie on a store-bought fly, but it just doesn’t seem to work. Frustrating, right? That’s where fly tying comes in. Tying your own flies gives you complete control over the design, size, and color, allowing you to adapt to the fish’s behavior on any given day.
Plus, there’s something uniquely satisfying about catching a fish with a fly you’ve tied yourself. It adds a personal touch to your angling experience.
Understanding the Basic Fly Tying Setup
Before jumping into the specific tools, it’s important to understand that fly tying requires a basic setup. You’ll want to create a space where you can focus on your craft. Whether it’s a dedicated desk or a corner of your garage, having a proper station makes all the difference.
The Fly Tying Station
Your fly tying station is more than just a workspace. It’s your creative hub. Keep your tools organized with a tool caddy or drawers, and make sure you have enough space to comfortably work on your flies. The last thing you want is to be hunting for a bobbin holder while trying to finish a delicate pattern.
Lighting: A Crucial Tool You Didn’t Think Of
We can’t emphasize this enough: good lighting is essential. Without it, you’ll struggle to see the fine details that make your flies effective. Invest in a quality lamp that casts bright, adjustable light. You’ll thank yourself later when you’re working on intricate patterns late into the evening.
The Essential Fly Tying Tools
Now let’s get to the heart of fly tying—the tools! Each one plays a unique role in bringing your fly to life. While there are many tools available, there are a few key items every beginner should have.
Vise: The Heart of Fly Tying
The vise is your fly-tying MVP. It holds the hook in place while you tie your materials around it. Without a vise, you’re essentially trying to build a house without a foundation. There are different types of vises available, ranging from basic to professional-grade. For beginners, a simple rotary vise is a great option, as it allows you to rotate the hook easily, offering better access to all sides.
Scissors: Precision Matters
When it comes to scissors, don’t skimp. A good pair of fly-tying scissors will make your life so much easier. You’ll use them to cut thread, feathers, and other materials, so precision is key. Look for fine-tipped scissors that can make small, accurate cuts.
Some fly tiers like to have multiple pairs: one for heavier materials and one for delicate work. If you’re just starting out, one solid pair will do the trick.
Bobbin Holder: The Threading Tool
The bobbin holder is one of those tools you might not think much about—until you try to tie without one. It holds the spool of thread and maintains the right tension while you tie. A good bobbin holder ensures that your thread stays taut, preventing unwanted slack that could ruin your fly.
Hackle Pliers: Gripping Made Easy
Handling delicate materials like feathers can be tricky, and that’s where hackle pliers come in. They allow you to grip and wrap hackles (feathers) around the hook with precision. It’s all about control, and hackle pliers make sure you have a firm grasp on things—literally!
Whip Finisher: For a Strong Finish
Once you’ve tied your materials onto the hook, you’ll need to secure everything with a knot. The whip finisher is the tool for this job. It creates a small, tight knot at the end of the fly, ensuring it doesn’t come undone while casting or during a fish’s strike. While you can tie knots by hand, the whip finisher makes the process much quicker and more reliable.
Bodkin: A Fly Tyer’s Best Friend
The bodkin is a simple tool, but oh, how useful it is. Think of it as your all-purpose needle. You can use it to apply small drops of glue, poke out trapped fibers, or even separate materials. The bodkin helps with the finer details that can make your fly stand out from the crowd.
Threader: Simplifying the Process
Ever struggle with threading a needle? The same challenge can apply to threading your bobbin holder. A threader makes this task a breeze by guiding the thread through the small opening of the bobbin tube. It’s a small tool, but it saves you from a lot of frustration.
Hair Stacker: Perfect Alignment Every Time
For flies that use hair or fur, a hair stacker is a must-have. It aligns the fibers so that the tips are perfectly even, giving your fly a neat, professional look. Without it, your hair wings might end up looking messy or uneven.
Dubbing Needle: The Secret to Fine Details
Dubbing needles are great for adding texture and details to your flies. They help you apply dubbing material (usually fur or synthetic fibers) in a controlled, uniform manner. With a dubbing needle, you can create flies with lifelike textures that mimic the look and feel of natural insects.
Additional Fly Tying Tools to Consider
Once you’ve mastered the basics, you might want to explore some additional tools that can make the process smoother or more efficient.
Tweezers: Handling Materials with Precision
Tweezers may seem like an unnecessary luxury when you’re starting, but trust me, they can make handling tiny, slippery materials a breeze. Whether you’re picking up delicate feathers, small hooks, or beads, tweezers offer the precision your fingers sometimes lack. They can also be handy for untangling fibers or placing materials exactly where you want them.
Magnifying Glass: See the Finer Details
As you get into more intricate fly patterns, especially the smaller ones, a magnifying glass can become a game-changer. It’s like giving your eyes a boost so you can see every detail up close. Many tyers invest in magnifying lamps, which combine bright lighting with magnification, allowing you to focus on the minutiae without straining your eyes. Your fly tying results will look sharper and cleaner with this added clarity.
Materials You’ll Need to Start Tying
Now that you’ve got your tools lined up, you’ll need the materials to actually tie flies. This is where fly tying becomes a blend of art and science, as you choose the best materials to imitate insects and baitfish.
Threads: The Backbone of Every Fly
Thread is essential for tying all your materials to the hook. Fly-tying thread comes in various thicknesses (measured in denier) and strengths, and what you choose will depend on the type of flies you’re tying. Thinner threads work better for small, delicate flies, while thicker threads are used for larger, more durable patterns. You’ll want to stock up on a few different colors and thicknesses as you get started.
Feathers, Furs, and Synthetics
Feathers, furs, and synthetic materials make up the majority of what you’ll be tying onto your flies. Feathers—especially from birds like roosters and ducks—are used to mimic the wings or legs of insects. Fur, often from animals like deer or elk, is used for adding bulk to flies or creating hair wings.
Synthetics, such as tinsel and flashabou, are man-made materials that add a little extra sparkle or movement to your flies. As you experiment, you’ll find different combinations of these materials will attract different fish species. Plus, it’s fun to mix and match!
Hooks: The Foundation of Your Fly
The hook is literally the foundation of your fly, so choosing the right one is important. Fly tying hooks come in a variety of shapes and sizes, depending on the type of flies you’re creating. Generally, the size of the hook is matched to the type of insect or baitfish you’re trying to imitate. Small hooks are great for delicate dry flies or nymphs, while larger hooks are used for streamers and saltwater patterns.
Make sure to start with a good assortment of hooks to cover the basics. Over time, you’ll develop a sense for which hooks work best for different flies.
How to Choose the Right Fly Tying Kit
If all this talk about tools and materials feels overwhelming, don’t worry! Many companies sell fly tying kits that bundle together all the essentials for beginners. These kits typically include a vise, bobbin holder, scissors, and a selection of materials and hooks. They’re a great way to get started without having to piece together everything yourself.
When choosing a kit, look for one that matches the type of flies you plan to tie. Some kits are designed specifically for tying dry flies, while others are geared towards nymphs or streamers. Most importantly, make sure the kit includes high-quality tools that will last you a while.
Practicing Your First Fly: Tips for Beginners
Alright, you’ve got your tools, materials, and a cozy tying station—now what? Well, it’s time to tie your first fly! Don’t be discouraged if your first few attempts look a little… rough. Fly tying is a skill that improves with practice, much like learning to cast.
Start Simple
Choose a simple fly pattern to begin with, like a Woolly Bugger or a San Juan Worm. These flies don’t require too many different materials, and they’re forgiving if your technique isn’t perfect yet.
Watch Tutorials
There’s a wealth of fly tying tutorials available online. Whether you prefer videos or step-by-step guides, learning visually can make a big difference. Don’t hesitate to pause and rewind until you’re comfortable with each step.
Be Patient and Have Fun
Fly tying is supposed to be fun! It’s easy to get frustrated when things don’t go as planned, but remember that every mistake is a learning opportunity. Take breaks, enjoy the process, and before you know it, you’ll be crafting flies that not only look great but catch fish too.
Conclusion: Start Tying Your Own Flies Today
Fly tying isn’t just about catching fish—it’s about creativity, patience, and a deeper connection with the art of fishing. As a beginner, the tools and techniques can seem overwhelming at first, but with practice, you’ll quickly improve and start crafting flies that you can be proud of.
The key is to start small, invest in the essential tools we’ve outlined, and enjoy the journey of learning something new. Before long, you’ll be out on the water casting flies that you tied yourself, and trust me, the first fish you catch on a homemade fly will feel like a massive victory.
So what are you waiting for? Get those tools ready, and start tying your own flies today!
FAQs
1. How much does it cost to start fly tying?
Starting out with fly tying can cost anywhere from $50 to $200, depending on the quality of the tools and materials you buy. Beginner kits are usually the most cost-effective way to get everything you need.
2. Do I need a specific table for fly tying?
You don’t need a special table, but having a dedicated, organized workspace is important. A simple desk or table with enough space to keep your tools and materials organized will do the trick.
3. What type of fly should a beginner start with?
A beginner should start with simple patterns like the Woolly Bugger, San Juan Worm, or Zebra Midge. These flies use fewer materials and are more forgiving to tie.
4. Can I tie flies without a vise?
While it’s technically possible to tie flies without a vise, it’s much harder. A vise holds the hook steady and frees up your hands to manage materials, making the process smoother and more precise.
5. What is the easiest fly tying material to work with?
Chenille, marabou feathers, and synthetic dubbing are some of the easiest materials to work with. They’re forgiving and give a lot of bulk and movement to the fly without much effort.


